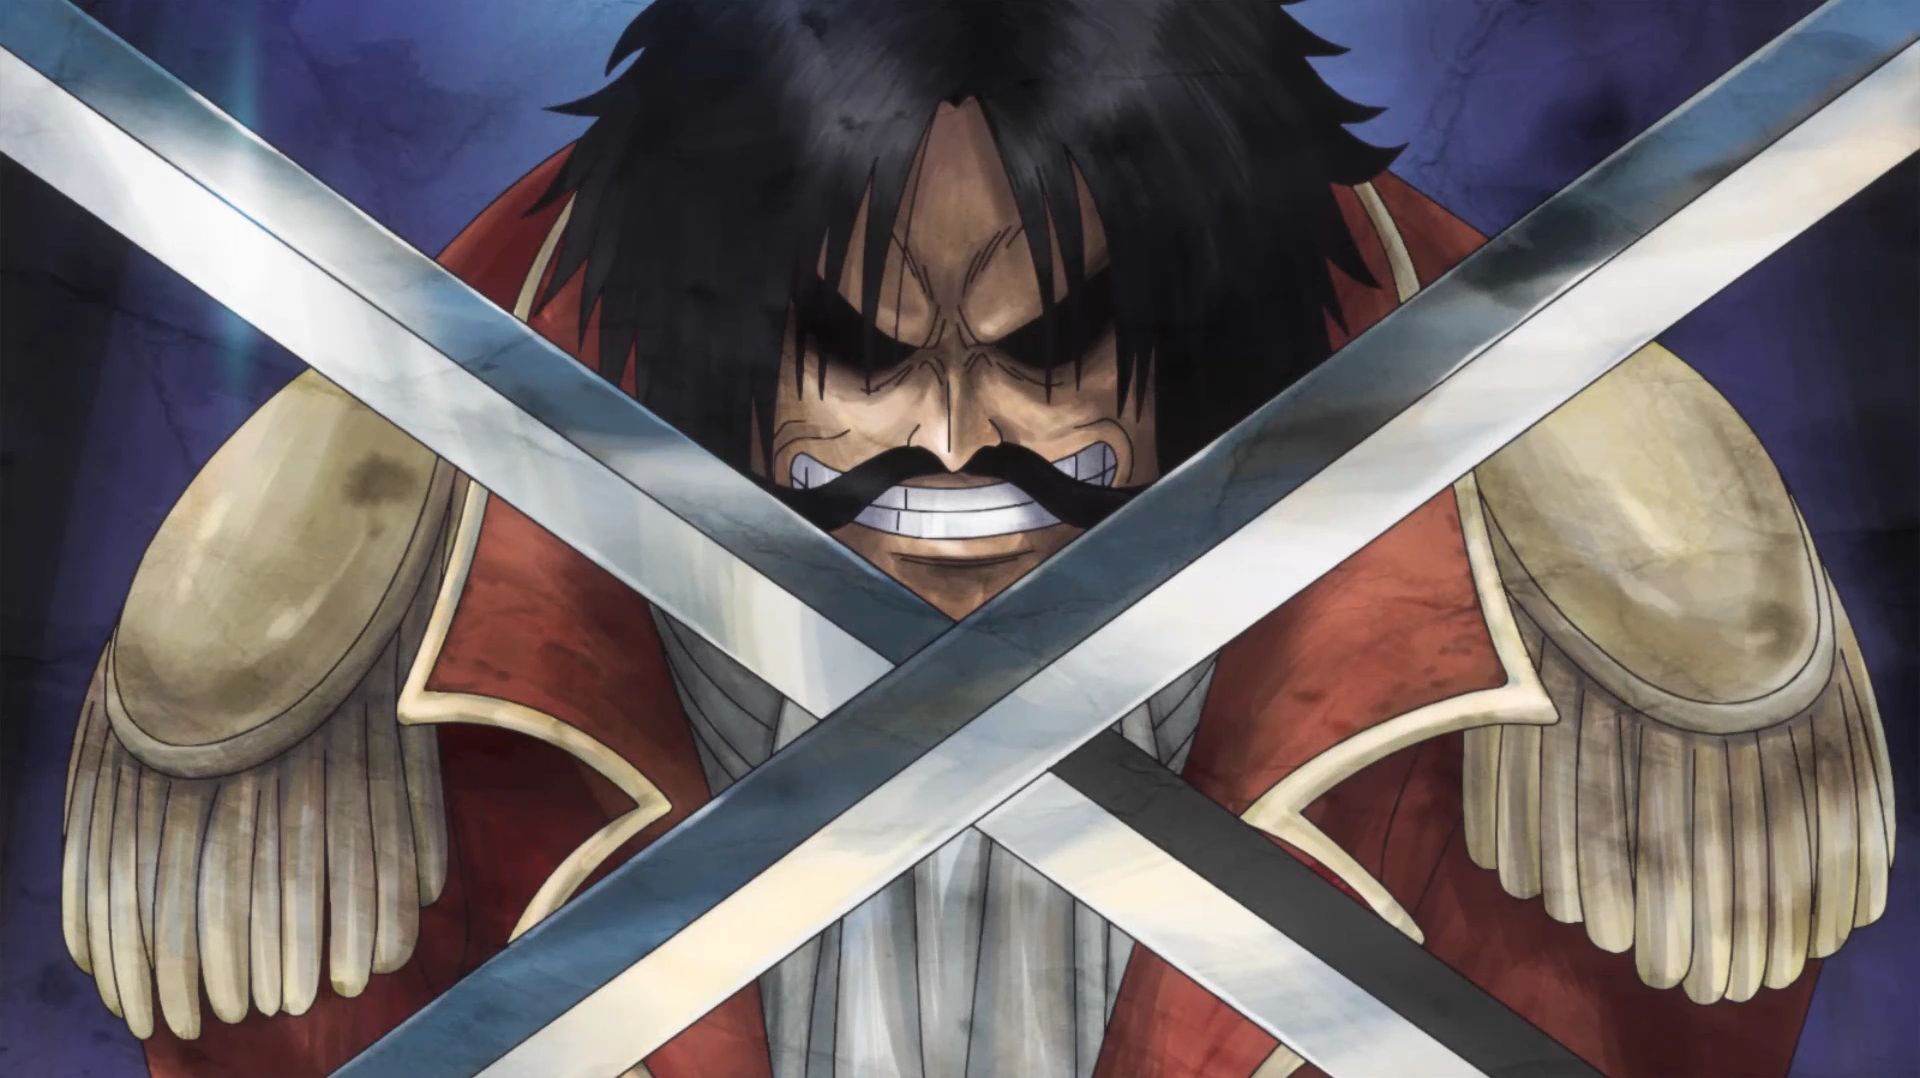
The Romance Dawn Arc, also referred to as the Captain Morgan Arc, is the first story arc in the East Blue Saga of the popular Japanese manga and anime series One Piece. This arc is made up of three stories in one. The first is the story of how Monkey D. Luffy gained his Devil Fruit abilities and tells of his driving force to become a pirate. The second story is his meeting with a boy named Koby and helping him escape from a female pirate named Alvida. In the final story, Luffy tries to get the Pirate Hunter, Roronoa Zoro, to join his crew while contending with the Marine Captain Axe-Hand Morgan.
Summary
Romance Dawn: The Origin of an Adventure
Gol D. Roger at his execution.
The series begins with a flashback of Gol D. Roger, the Pirate King, about to be executed in front of a crowd. However, before he dies, he tells the crowd that he has left everything he owns in one place and all they have to do is go and find it. Thus, this causes countless pirates to set off to find Roger's treasure, One Piece and the beginning of the Golden Age of Pirates.[1]
Twelve years later in Foosha Village, Luffy (who is seven at this point) is seen on a ship trying to prove his worth to the Red Hair Pirates by cutting himself on the cheek which ends up leaving a scar. It then cuts to a scene where Luffy is with Shanks and his crew in the Partys Bar owned by Makino. Due to his interactions with the Red Hair Pirates for the year they have stayed at the village, Luffy not only began to idolize Shanks, he has even desired to become a pirate as well. While in the bar, Luffy tries to convince Shanks to let him join his crew; however, Shanks turns him down due to him being too young and his inability to swim. [2] Luffy then questions Shanks on how long they are going to stay in which Shanks replies that they will take about two or three more trips then deport. This causes Luffy to state that he will learn how to swim by then.
Shanks and the Straw Hat.
It is then that Higuma and his bandits enter the bar while Higuma makes a remark about never seeing pirates before and how pathetic they are. He then demands ten barrels of sake; however, Shanks and his crew drank the bar dry. Shanks then apologizes to Higuma then offers the last bottle to him; but, unsatisfied with just one bottle, Higuma smashes the bottle on Shanks’ head. Shanks then comments on the mess that Higuma makes while he is boasting about the bounty he has over his head. When Shanks ignores his boasts and asks Makino for a rag to clean the mess, he then smashes the plates out of rage before taking his leave. Once Higuma and his group leaves, Shanks and his crew laugh at the events that just occurred while Luffy is angered at the fact that Shanks looked weak cause he did not fight back. [3] Shanks then states that it wasn’t worth getting into a fight over.
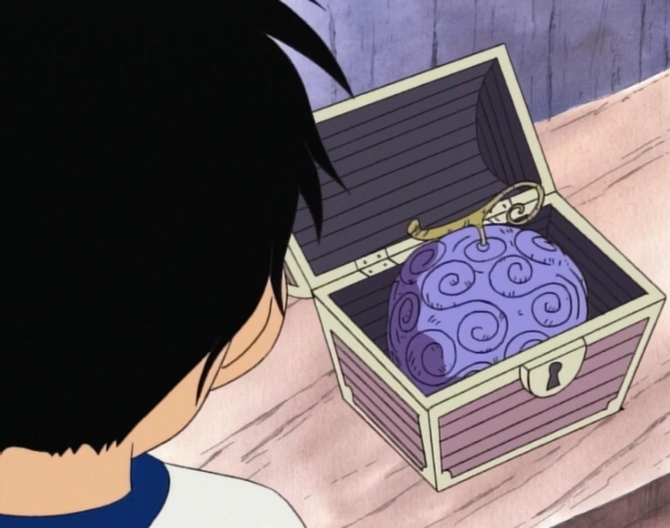
After Shanks’ retort, Luffy starts to leave and Shanks grabs onto Luffy’s arm; however, Luffy’s arm begins to stretch which causes the entire crew to panic. Lucky Roux looks in a chest to discover that the fruit that was in it is gone and proceeds to question Luffy if he ate it which he replies that he did. Shanks reveals to Luffy that the fruit that he ate was a Devil Fruit and not only did it caused his body to be rubber; it also took his ability to swim. [4]
The Gomu Gomu no Mi: a Devil Fruit that gives the eater the ability to stretch their body.
The next day, Luffy starts to see an upside in eating the fruit. He begins to show off his rubber abilities to some of the villagers, much to the chagrin of the mayor of the village, who does not like the idea of Luffy becoming a pirate. Later, Luffy visits Makino and once again expresses his disappointment at Shanks for not fighting back the day before. Suddenly, Higuma and his bandits enter the bar.[5]
The story shifts ahead a bit when Makino runs to the mayor for help, because Luffy had upset the bandits and they are beating him up. After a couple of poundings, Higuma goes to finish Luffy off. The mayor tries to apologize for Luffy's actions and offers money for his safety, but Higuma refuses and continues to attack Luffy anyway. Shanks suddenly returns and demands Higuma to let Luffy go. Higuma laughs at Shanks and sends his men to kill him, as well. However, Shanks' first mate easily takes care of Higuma's thugs. When Shanks again demands that he let Luffy go, Higuma throws a smoke bomb, grabs Luffy, and escapes. Shanks starts panicking, but his first mate notices something.[6]

Shanks saves Luffy's life.
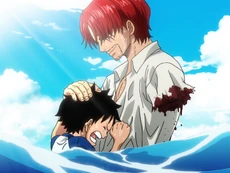
Higuma sails a boat away from the town, claiming a perfect getaway because no one suspects a bandit would flee to the ocean. Far from land, Higuma throws Luffy into the water and, true to the myth of the Devil Fruit, Luffy is unable to swim. A flashback shows us that when Higuma re-entered the bar, he immediately started bad-mouthing Shanks, to which Luffy took offense and screamed for them to take back their words. Back in the present, Higuma laughs at Luffy's struggle but fails to notice the giant sea monster creeping up on him - until it is too late and he is eaten in one bite. The monster then sets his sights on Luffy, but Shanks pulls him away just in time and, with a very menacing expression on his face, tells the sea monster to leave. The monster leaves and Shanks tries to calm down a sobbing Luffy, who points out that Shanks' left arm has been chomped off. Shanks tells him it is just a small price to pay for saving him.[7]
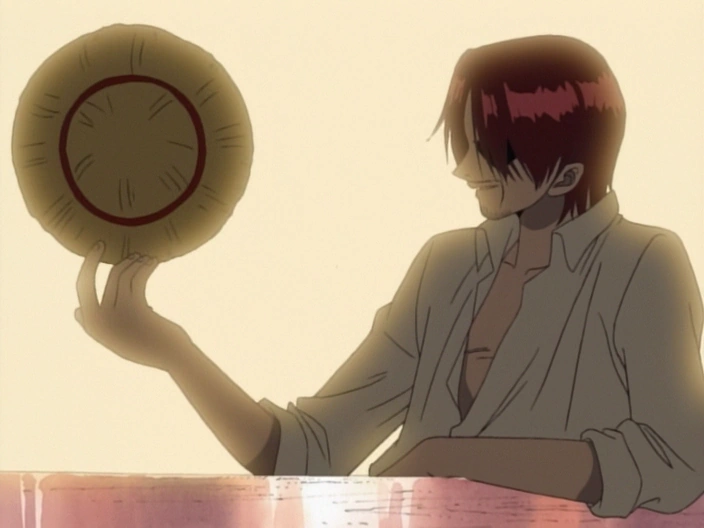
Some time later, Shanks' crew prepares to leave the village for the last time, and Luffy comes to say his goodbyes. When asked if he is disappointed, Luffy replies he is, but will not ask to join and that he will be a pirate on his own. Shanks teases him again and Luffy screams that he will be a better pirate than him, and that he will be the Pirate King. Upon hearing this, Shanks gives Luffy his favorite straw hat and makes him promise that he will return it someday when they meet again. Afterwards, Shanks and his crew leave the village.[8]
Ten years pass and Luffy, now 17 years old, is old enough to leave on his own. As Luffy sails away from his village, he runs into the sea monster again. This time, Luffy is ready and punches the monster with a Gomu Gomu no Pistol, instantly knocking it out. Luffy once again claims that he will become the Pirate King![9]
On the High Seas: First Voyage
The next act in the arc finds Luffy being sucked into a whirlpool but rescued by a pirate crew when they find him in a barrel (which he jumped into at the last second). Their captain, an ugly and fat woman named Alvida, barges in after their discovery, thinking that they are drinking behind her back. However, the crewmates put the blame on their cabin boy, Koby.[10]
Meanwhile, in some woods not far from the ship, Luffy gets acquainted with Koby, who turns out to be quite the coward and only became a cabin boy because he got on the wrong ship while out fishing, and it was the only way to spare his life. Koby also reveals he wants to be a Marine, but feels this goal is out of his reach. However, when Luffy tells Koby of his dream and his willingness to do it or die trying, Koby starts to get inspired. This turns out to be good timing, as Alvida finds the two and barks at Koby to say who the prettiest person in the world is (something she makes all of her crew do). At first Koby starts to do as told, but remembering Luffy's words, he blurts out that Alvida is the ugliest hag in the sea.[11]

Luffy faces Alvida.
This, of course, angers Alvida, and she goes to kill Koby with her iron mace (her signature weapon). Luffy pushes him back and takes the blow, taking no damage as his rubber body absorbs the impact. He then retaliates by hitting Alvida with a Gomu Gomu no Pistol, knocking her out with one punch. He then demands to the rest of her crew to give Koby a dinghy so he can fulfill his dream of joining the marines.[12]
The crew does so and the two sail off with Luffy wondering if he can get a famed pirate hunter named Roronoa Zoro to join his crew, though Koby thinks it will never happen.[13]
Against the Oppressive Axe: Recruiting A Swordsman and Skirmish with the Marines
The third and final act of the arc sees Luffy and Koby arriving in Shells Town, home to a local Marine base. While stopping at a café to eat, the two talk about Zoro and Captain Morgan, which make the residents a little jumpy when their names are mentioned and gives Koby a bad feeling.
The two boys then head for the Marine base, where they see the pirate hunter Zoro tied to a post. Zoro tries to get the two to untie him, which Luffy is all for and Koby is against. Before the two can make their decision, a girl (to be known as Rika) climbs over the gate and goes to Zoro, offering him some rice balls. He refuses and tries to send her away, but a man in a tacky outfit with Marines behind him approaches. He is Helmeppo, Captain Morgan’s spoiled son. Helmeppo swipes Rika’s rice balls and eats them, only to spit them out and complain they have too much sugar (they are supposed to be seasoned with salt). He stomps them into the dirt right before her eyes before ordering one of his men to literally throw Rika out. Luckily, she is caught by Luffy.

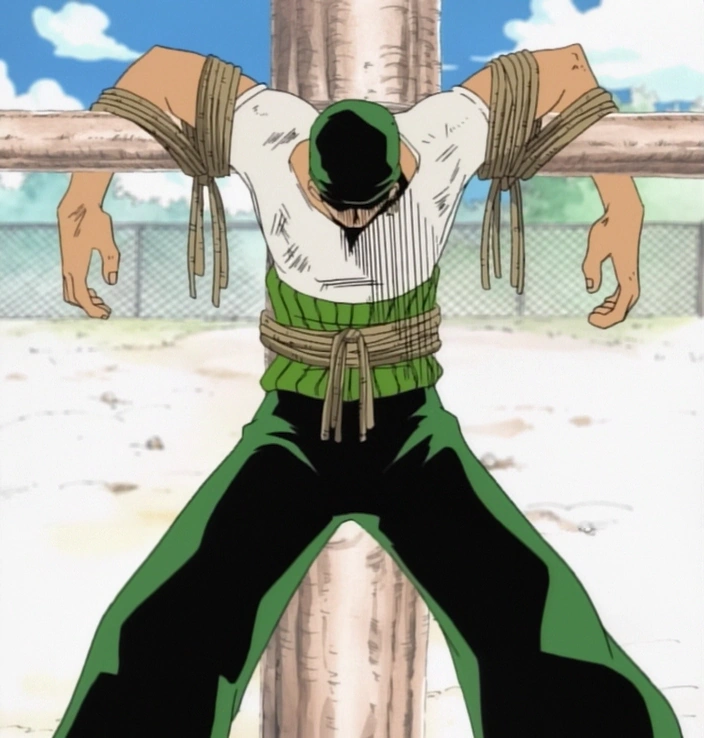
Zoro tied up without food as part of a deal.
Helmeppo then talks with Zoro, where it is revealed that if Zoro can survive a month at the stake with no food, Helmeppo promises he will let him go. After Helmeppo and his guards leave, Luffy confronts Zoro and asks him to join his crew. Zoro initially turns him down, but before Luffy leaves, Zoro asks him to feed him the now heavily dirtied rice balls. After he eats it, he tells Luffy to tell Rika that they were delicious. Luffy relays it to her back in town, giving Koby a sense that Zoro cannot really be all bad.
Rika then tells Luffy and Koby that Zoro was thrown in prison for protecting her from a mean dog of Helmeppo's that was attacking her and the town. She also reveals that Morgan is the true menace to the island. Helmeppo happens to stroll into town at that very moment, bragging that he will put Zoro to death in three days. When Luffy confronts him on his promise, Helmeppo admits he was lying, to which he receives a punch in the face from Luffy once the truth is known.
The towns people start to panic as Helmeppo threatens to tell his dad what happened. Luffy, however, is not worried and heads back to the base. In the base, Helmeppo bursts into his father's quarters, yelling that he wants him to kill someone. On the Marine ground, Luffy confronts Zoro again and makes a rather unfair deal with the swordsman. Luffy will get Zoro’s swords from the base, but if Zoro wants them back, he has to join the crew. Luffy then heads for the fortress, while Zoro thinks that Luffy is a pretty dumb pirate.
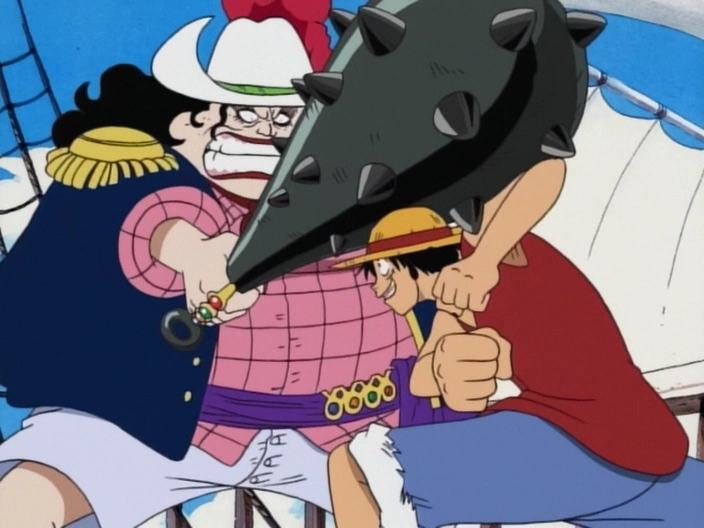
At the top of the fortress, the Marines are preparing to raise a newly finished statue of Captain Morgan, who is finally introduced. He smacks and then chides his son for his whining. He then shows his cruel side when he kills a lieutenant for not following his orders to search for and kill Rika. As the men begin to raise the statue, Luffy uses his rocket move to reach the top of the fortress, but overshoots. Luffy grabs onto the statue to stop himself, pulling the statue to the edge of the fortress and breaking it in half. Morgan is outraged and orders his men to kill Luffy, who ignores them and grabs Helmeppo before running into the base. On ground level, Koby is trying to untie Zoro while asking him to join Luffy and stop Morgan. Before he can finish his task, he is shot.
In the base, Luffy is trying to get Helmeppo to tell him where Zoro’s swords are. He uses the man as a shield when he runs into Marines. Back on ground level, we see Koby has only been hit in the arm. When Zoro tries to tell him to escape, Koby reveals Morgan's true intention of killing him. Morgan then appears before the two with a firing squad in tow. Luffy finds Zoro's swords but notices both of his friends about to be killed. As the squad prepares to fire, Zoro reflects on his past when he was younger and met a girl named Kuina who he could not beat in a duel, despite him being the strongest in his class.
One night, he challenges Kuina to a fight with real swords, which results in his 2001st loss against her. However, Kuina reveals that she will get weaker when she grows older and cannot become a true swordsman. Zoro convinces her otherwise and makes her promise that one of them will someday become the greatest sword fighter in the world. Sadly, Kuina dies the next day from falling down some stairs, prompting Zoro to take it upon himself to keep their promise. Back in the present, Morgan tells the squad to fire, but Luffy jumps in front of the two, taking the bullets and then bouncing them right back at the Marines. He then asks Zoro one more time to join his crew, which, under the circumstances, Zoro accepts.
Luffy then unties him just as the Marines are bearing down on them with their swords. Surprisingly, Zoro holds them all off with his Santoryu. He then pledges his loyalty to Luffy, though he threatens to make Luffy commit suicide if he interferes with Zoro's dream. Luffy accepts his terms, then takes care of the Marines with a Gomu Gomu no Muchi (a stretching leg sweep). Morgan then confronts Luffy with his axe-arm, but the fight turns out to be very one-sided as Luffy keeps hitting Morgan without taking a blow himself.

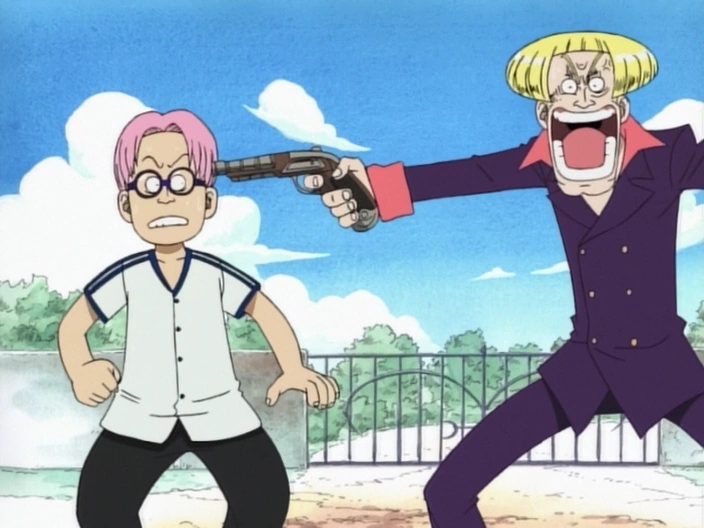
Helmeppo threatens to kill Koby unless Luffy stops beating up his father.
Helmeppo stops the fight when he shows that he is holding Koby hostage with pistol to his head. Koby, however, tells Luffy not to worry about him and to defeat the captain. Morgan rises over with his axe, ready to deliver a fatal blow, as Luffy hits Helmeppo with a Gomu Gomu no Pistol, but Zoro stops Morgan at the last second. The Marines soon rejoice after his defeat, as Captain Morgan’s tyranny is finally over.
Later, Luffy, Zoro, and Koby are rewarded with a dinner at Rika’s house. As the three discuss their future plans, a Marine Lieutenant named Ripper confronts the three, telling Luffy and Zoro that they have to leave since they are pirates, despite having saved them, though Ripper points out that he will not report them to headquarters to repay the favor he owes them. When the issue is brought up of Koby (because of his cabin boy background), Luffy starts to reveal his past, to which Koby socks him in the face. The two start to fight until the Lieutenant orders Luffy to leave. Koby realizes Luffy helped him out once again and comes to the realization that he must start standing up for himself. He proclaims to the Lieutenant that he is no pirate and that he will be a Marine. This is enough to get him accepted.
As Luffy and Zoro prepare to leave town, Koby catches up with them and salutes the two, followed by the rest of the Marine base. Luffy tells Koby they will meet again someday as he and Zoro ride off to continue their adventure.
Story Impact
- Many important characters are introduced in this arc, such as Monkey D. Luffy, Shanks, and Roronoa Zoro.
- Zoro joins Luffy's crew.
- Both Luffy and Zoro's dreams are revealed.
- Koby and Helmeppo make their first appearance, and their importance to the overarching storyline will be shown in the Post-Enies Lobby Arc and the Marineford Arc. The manga mini-arc Diary of Koby-Meppo (which was later animated into episodes 68-69 between the Whisky Peak Arc and the Little Garden Arc) also shows how they became friends and also how they met Vice Admiral Garp.
- It is the first time that Luffy becomes recognized by the authorities. After toppling Morgan's reign, the Marines take Luffy's actions into account before issuing a bounty. The Marines in this arc do not contact Marine Headquarters to issue a bounty towards Luffy as a favor for defeating Morgan. It would not be until after the battle in the Arlong Park Arc that Luffy would receive his first bounty.
Anime and Manga Differences
The anime does not start with Romance Dawn (which is instead the focus of Episode 4), but on a cruise ship. Nami is the first character to make an appearance instead of Luffy and she is seen sneaking on board. She is also later seen in Episode 3 in Shells Town, searching for the Grand Line map, but it appears to have been stolen by the Buggy Pirates.
Luffy's barrel is brought onboard the cruise ship by some of its crew instead of Koby, and Alvida is shown attacking the cruise ship instead of stationing on an island.
In the manga, Alvida throws her spiked club at one of her crewmates for being lazy. However, this has been omitted in the anime.
In the manga, both Luffy and Zoro's pasts were revealed in this arc, while in the anime their pasts were placed in filler episodes that take place between different story arcs. Luffy's flashback was placed between the Romance Dawn and the Orange Town arcs in Episode 4, while Zoro's flashback takes place between the Syrup Village and Baratie Arcs in Episode 19. However, Zoro's promise to Kuina is still mentioned in this arc in the anime.
In the manga, the scene where Zoro rescues Rika from Helmeppo's dogs, and later, when Helmeppo boasts he is going to break his promise to Zoro by executing him in three days, only for Luffy to hit him, took place on the streets, while in the anime both scenes take place inside of Rika's family's restaurant. Also, Helmeppo's dogs were killed in the manga, while only one dog appeared in the anime, at which Zoro simply threw a chair.
In the manga, when one of Morgan's soldiers informs him that Koby is attempting to untie Zoro from his post, Morgan puts a stop to it by shooting Koby in the shoulder from the top of the tower with a pistol, however, in the anime this is omitted.
In the manga, when Morgan ordered his men to kill themselves, they pointed their guns at their own heads as they were too afraid of Morgan. In the anime, they simply gave him an angry glare.
In the anime, the scene where Luffy defeats the Lord of the Coast is not shown and instead is shown in the flashback during the Post-War Arc.
4Kids Edits
- The top half of the post Zoro was tied to is erased because it looked too much like a crucifix.
- The riceballs were changed to cookies.
- Helmeppo's gun was changed to a bizarre spring-loaded hammer.
- Lucky Roux's pistol is changed to a pop gun, so he only knocks the nameless bandit unconscious instead of killing him.
- Throughout the rest of the first few arcs (not the filler arcs), the Devil Fruits are called Cursed Fruits, but the original name is kept in the FUNimation English dub.
References
- ↑ One Piece Manga — Vol. 1 Chapter 1 (p. 1), Opening Theme 1 We Are!
- ↑ One Piece Manga and Anime — Vol. 1 Chapter 1 (p. 4) and Episode 4.
- ↑ One Piece Manga and Anime — Vol. 1 Chapter 1 (p. 13) and Episode 4.
- ↑ One Piece Manga and Anime — Vol. 1 Chapter 1 (p. 19) and Episode 4.
- ↑ One Piece Manga and Anime — Vol. 1 Chapter 1 (p. 21) and Episode 4.
- ↑ One Piece Manga and Anime — Vol. 1 Chapter 1 (p. 24) and Episode 4.
- ↑ One Piece Manga and Anime — Vol. 1 Chapter 1 (p. 38) and Episode 4.
- ↑ One Piece Manga and Anime — Vol. 1 Chapter 1 (p. 45) and Episode 4.
- ↑ One Piece Manga and Anime — Vol. 1 Chapter 1 (p. 48) and Episode 4.
- ↑ One Piece Manga and Anime — Vol. 1 Chapter 2 (p. 1) and Episode 1.
- ↑ One Piece Manga and Anime — Vol. 1 Chapter 2 (p. 11) and Episode 1.
- ↑ One Piece Manga and Anime — Vol. 1 Chapter 2 (p. 19-22) and Episode 1.
- ↑ One Piece Manga and Anime — Vol. 1 Chapter 2 (p. 23) and Episode 1.
| Romance Dawn Arc | |||||||||||
|---|---|---|---|---|---|---|---|---|---|---|---|
| Manga Chapters | |||||||||||
| 1 | 2 | 3 | 4 | 5 | 6 | 7 | |||||
| Manga Volumes | |||||||||||
| 1 | |||||||||||
| Anime Episodes | |||||||||||
| 1 | 2 | 3 | 4 | ||||||||
| Specials | |||||||||||
| Episode of Luffy • Episode of East Blue | |||||||||||
| Live Action Episodes | |||||||||||
| Romance Dawn | |||||||||||
| |||||||||
| |||||||||
| |||||||||
| |||||||||||||||||
| |||||||||||||||||
| |||||||||||||||||
| |||||||||||
| |||||||||||
| |||||||||||
| |||||||||||||||||
| |||||||||||||||||
| |||||||||||||||||
| |||||||||
| |||||||||
| |||||||||
| |||||||||||
| |||||||||||
| |||||||||||
| |||||||||||
| |||||||||||
| |||||
| |||||||||||||||||||||
| |||||||||||||||||||||
| |||||||||||||||||||||
| |||||||||||||||||||||
| |||||||||||||||||||||